> ## Documentation Index
> Fetch the complete documentation index at: https://captions.ai/llms.txt
> Use this file to discover all available pages before exploring further.
# Auto-edit clips with captions, B-roll, and music in AI Edit
> Turn any clip into a polished video with Captions AI Edit. Pick a style and get auto captions, transitions, B-roll, music, and motion graphics on iOS and web.
### How It Works
1. Import your clip
2. Choose from a growing list of styles
3. Select the language of your AI Edit project
4. Let AI edit your video for you
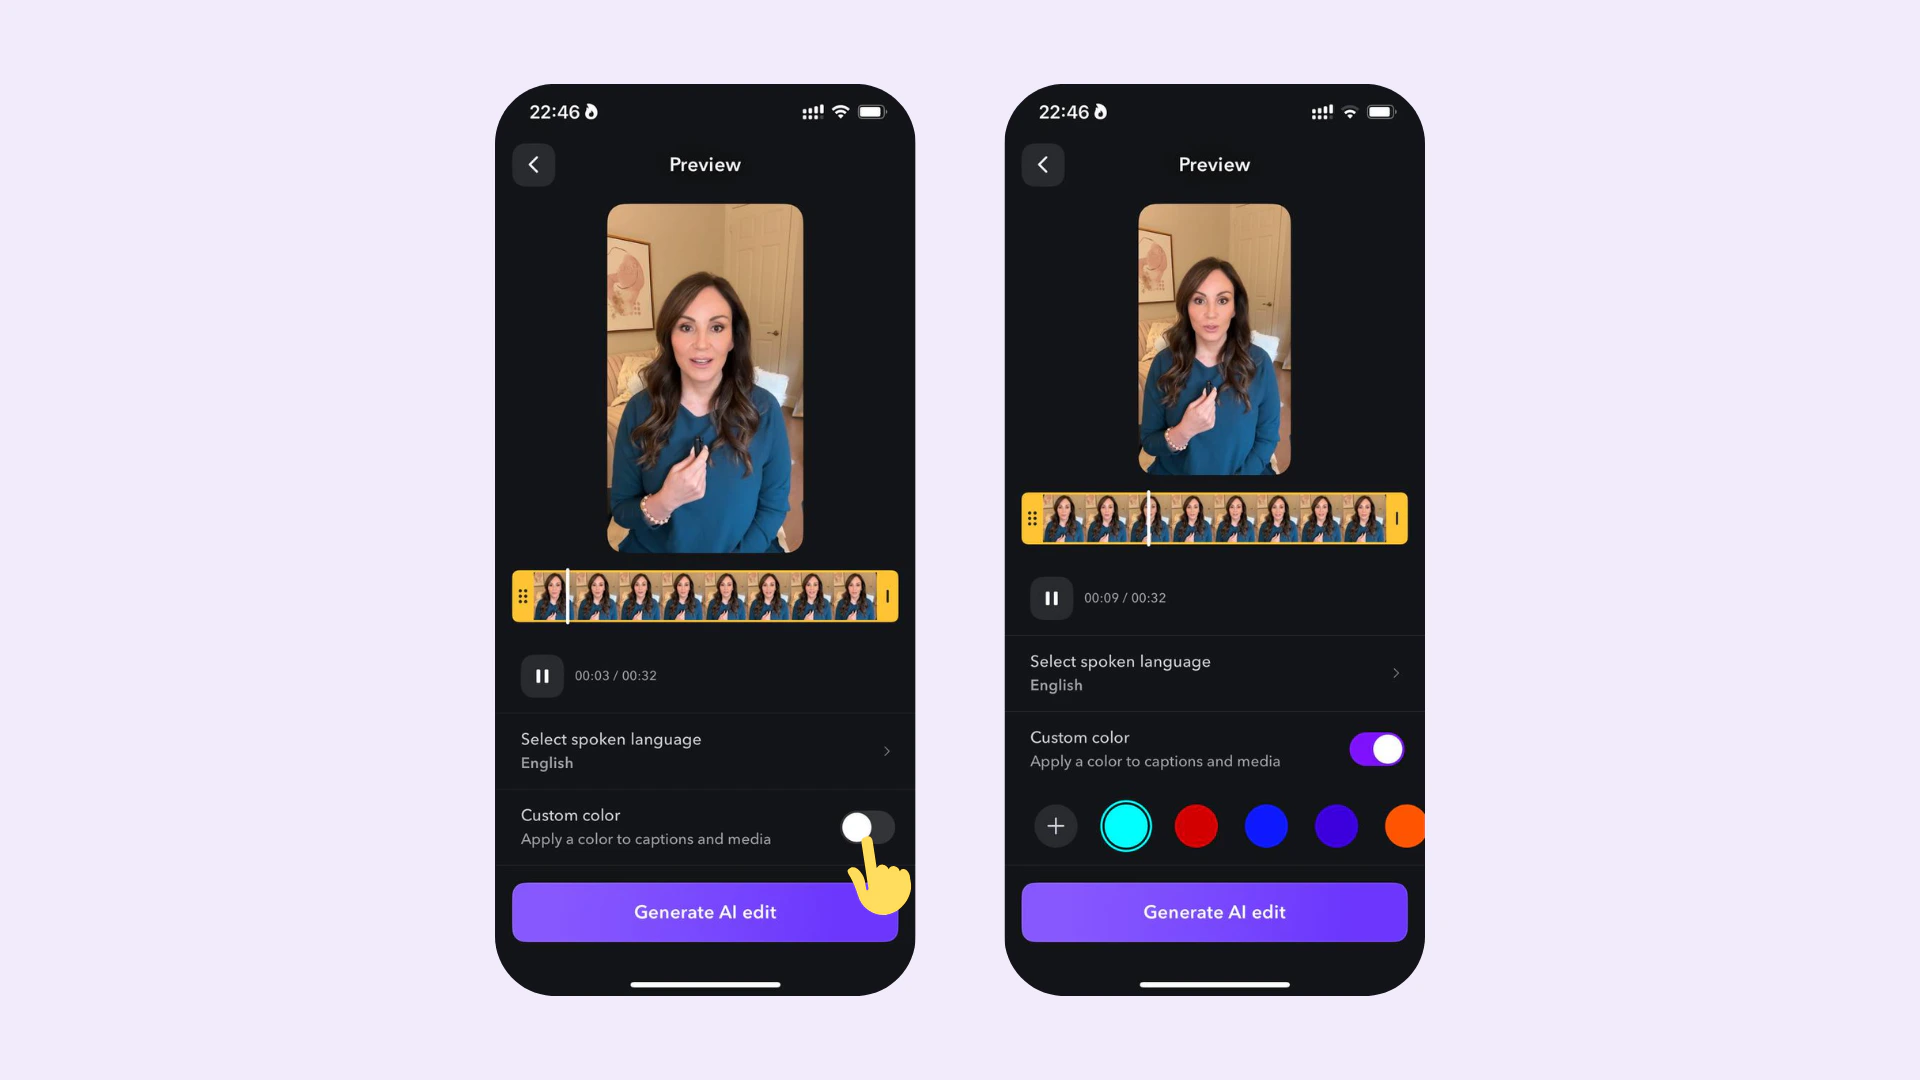
You can customize the color of [captions](/help/docs/captions/styles) and added media in your AI Edit project by turning on the **Custom color** option.
 ### How To Edit AI Edit Projects
You can edit the shot style, added texts, images, music and color effects in your AI Edit project:
### How To Edit AI Edit Projects
You can edit the shot style, added texts, images, music and color effects in your AI Edit project:
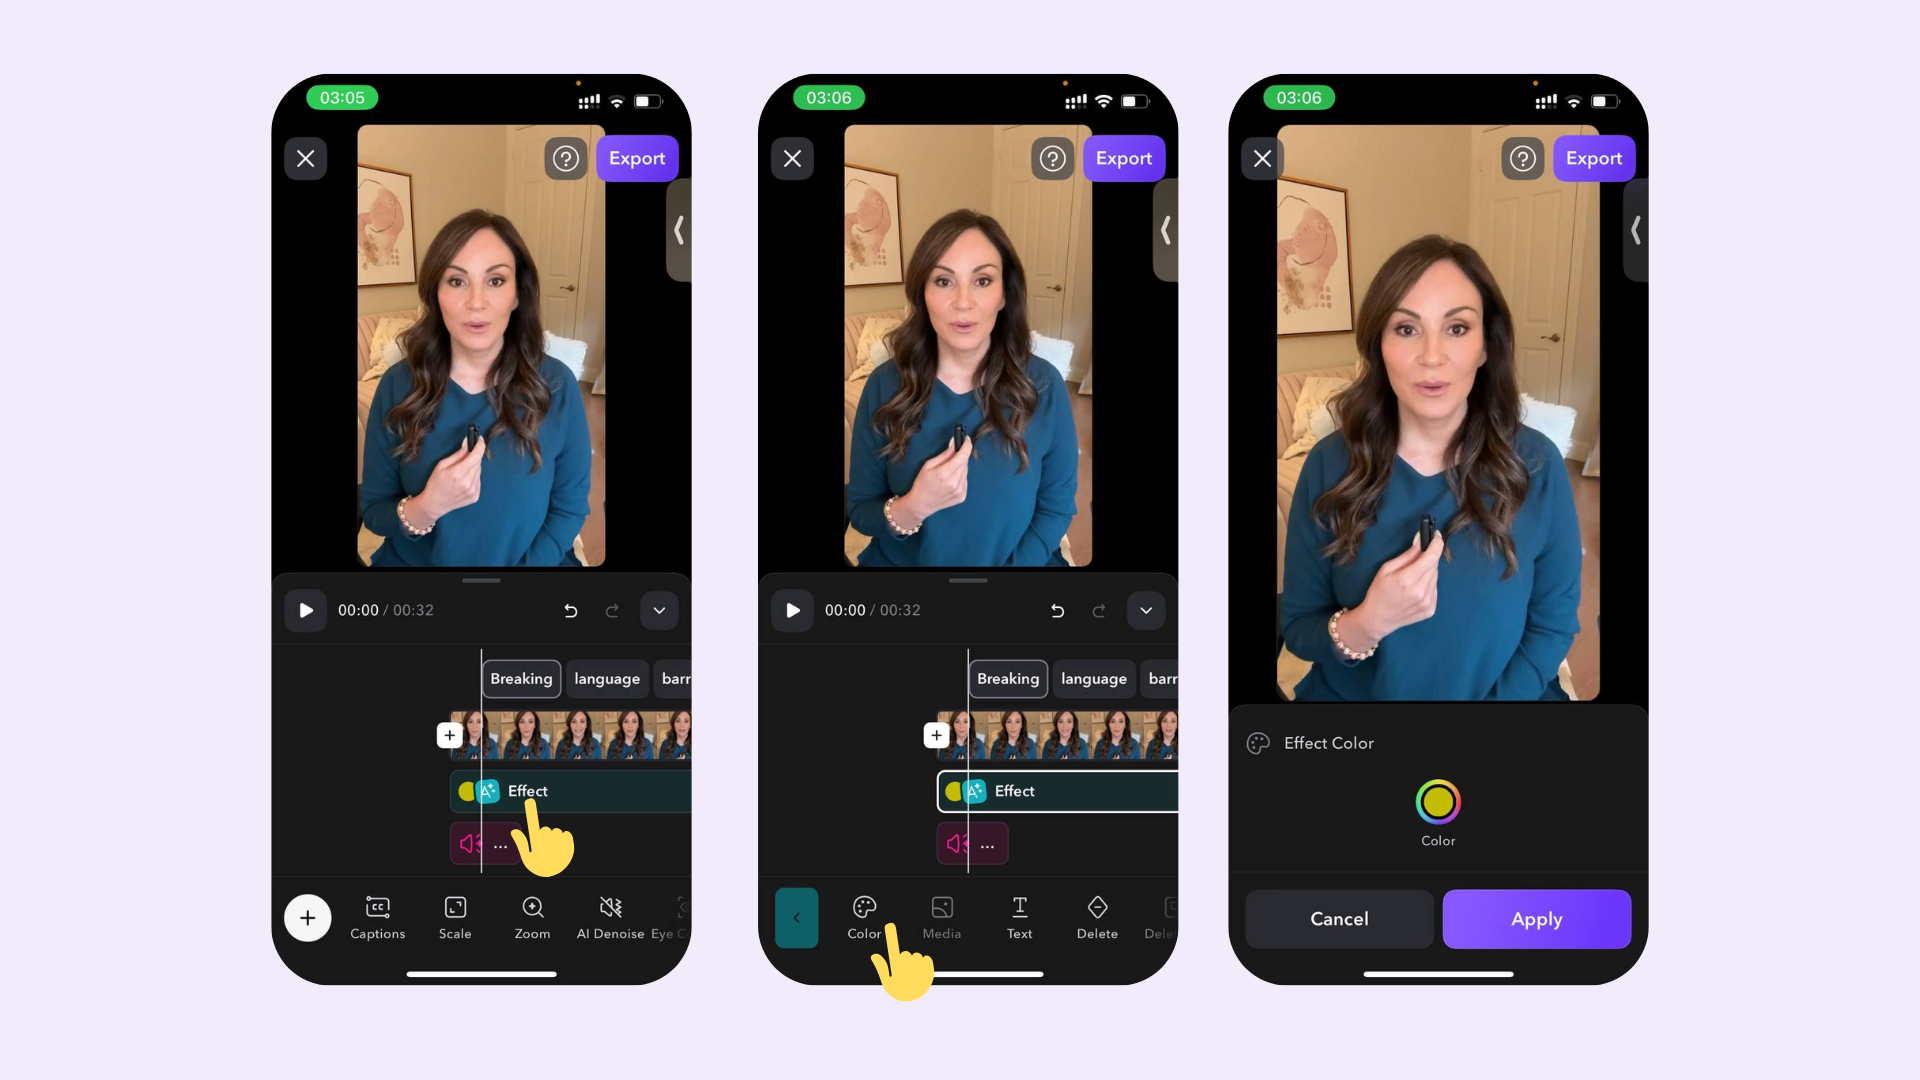 1. Select the added effect (e.g. an added text) in the timeline
2. Change its color, position, image or delete it
To change the style of a shot:
* Tap on your shot in the timeline
* Tap **AI Edit**
* Choose your new shot style
* To prevent existing images from getting removed, you can enable the **Keep existing images** option.
### AI Edit workflow on the web
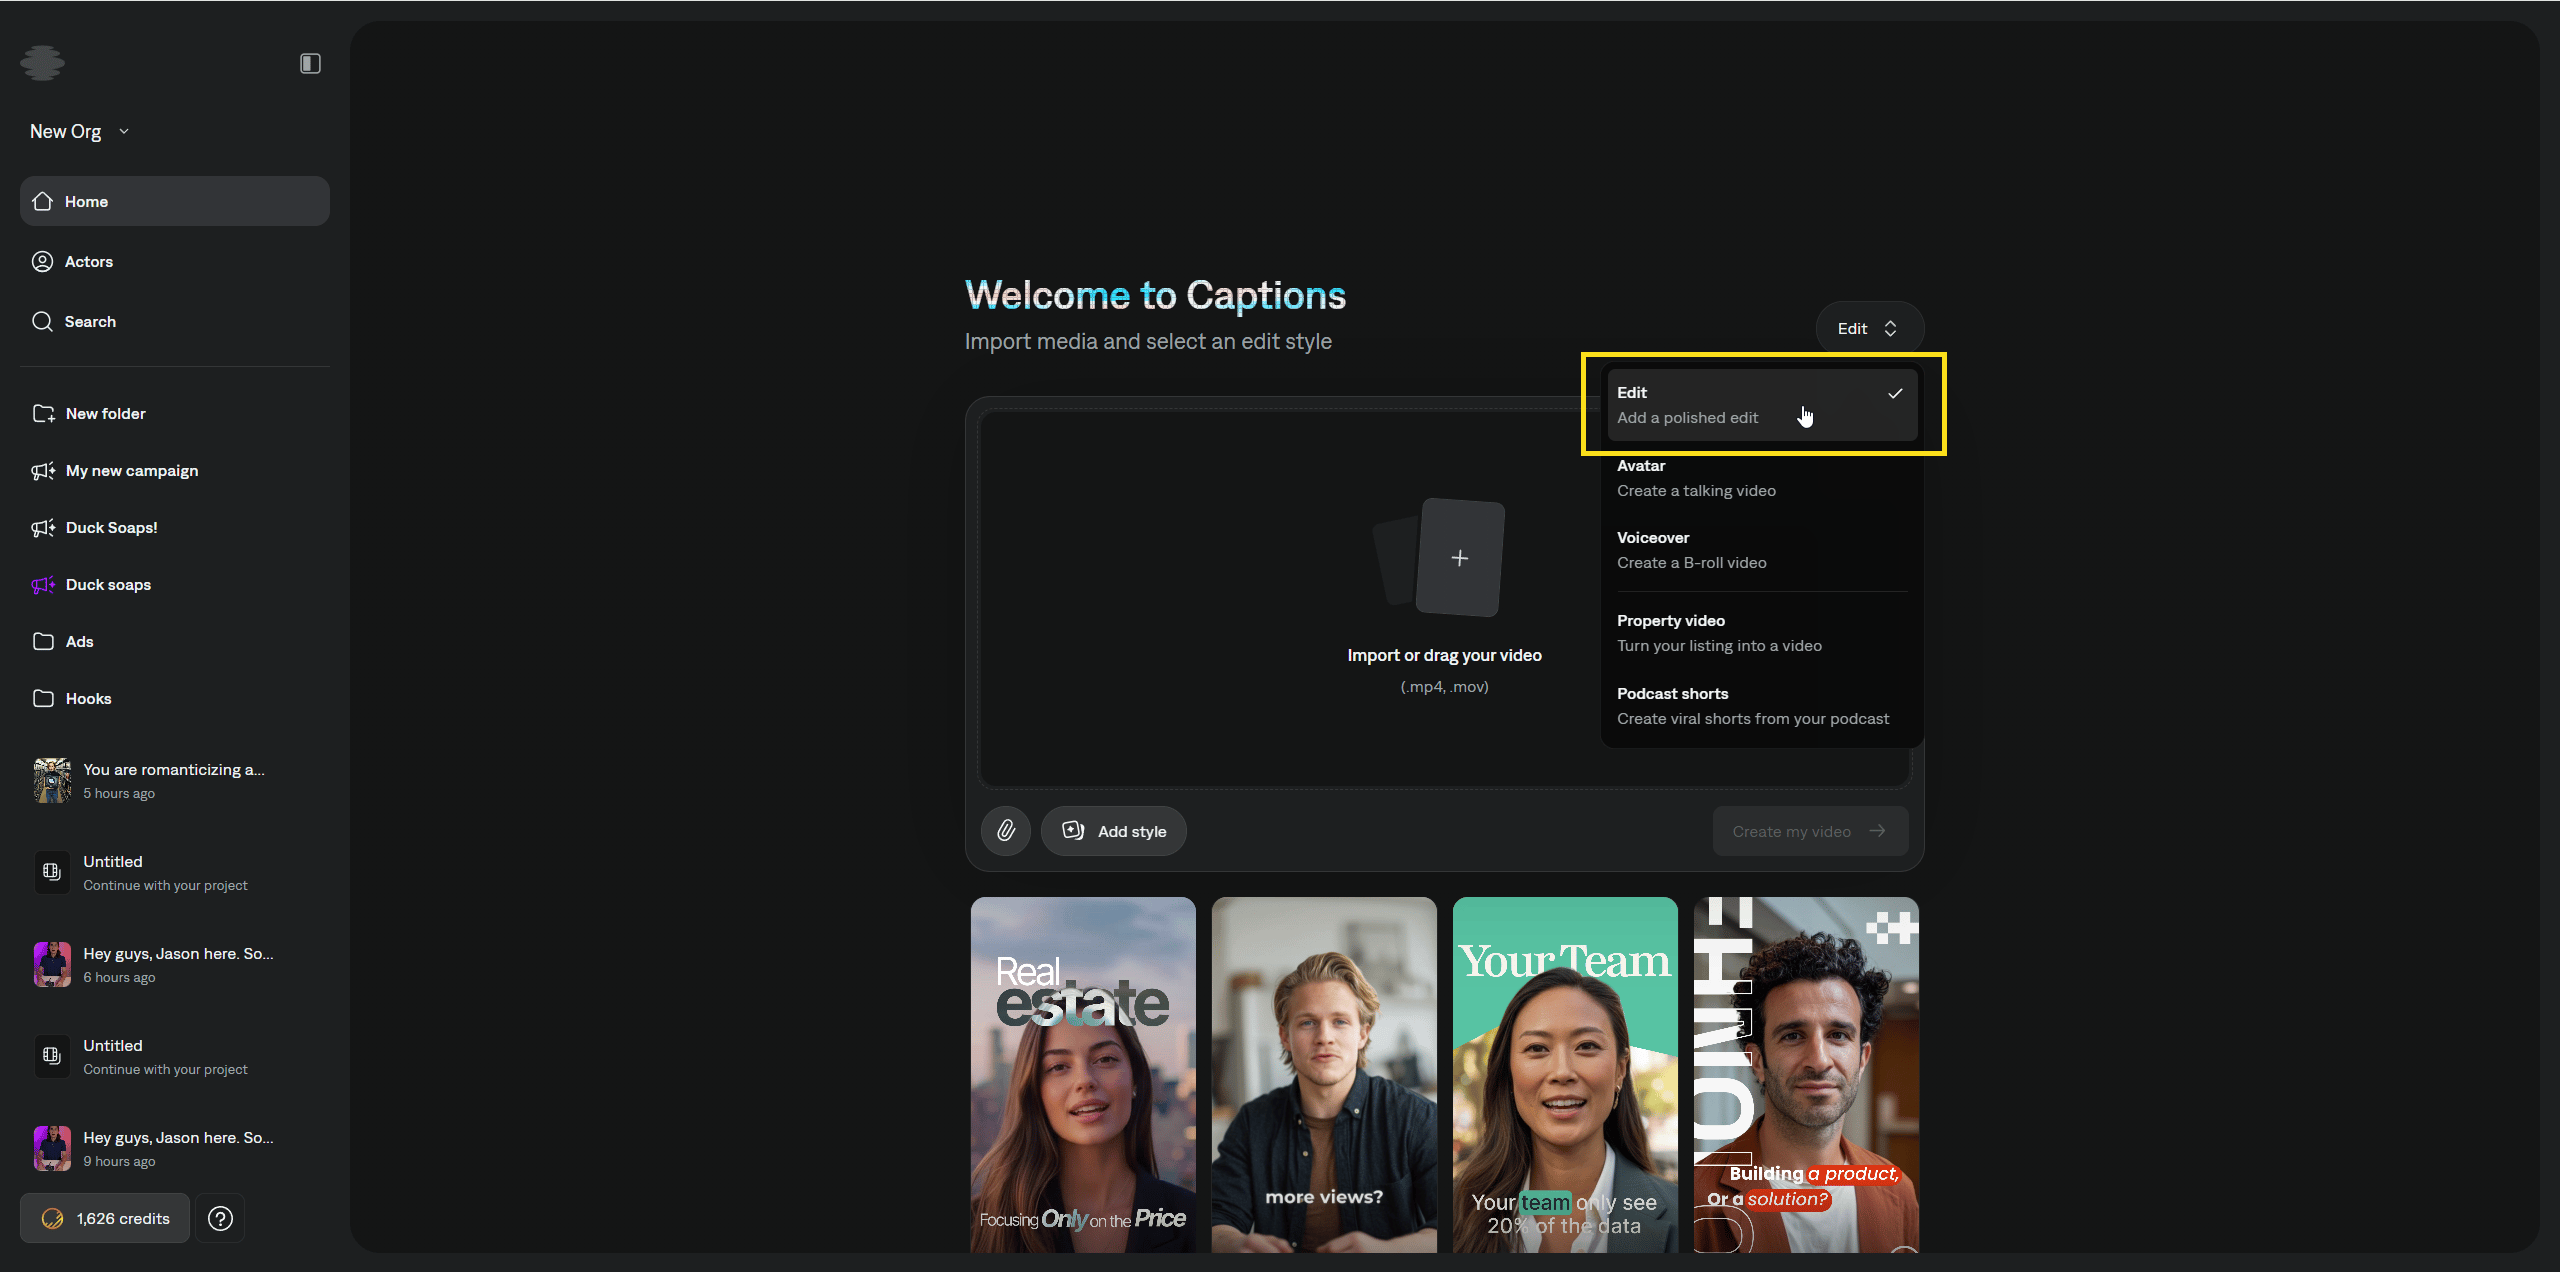
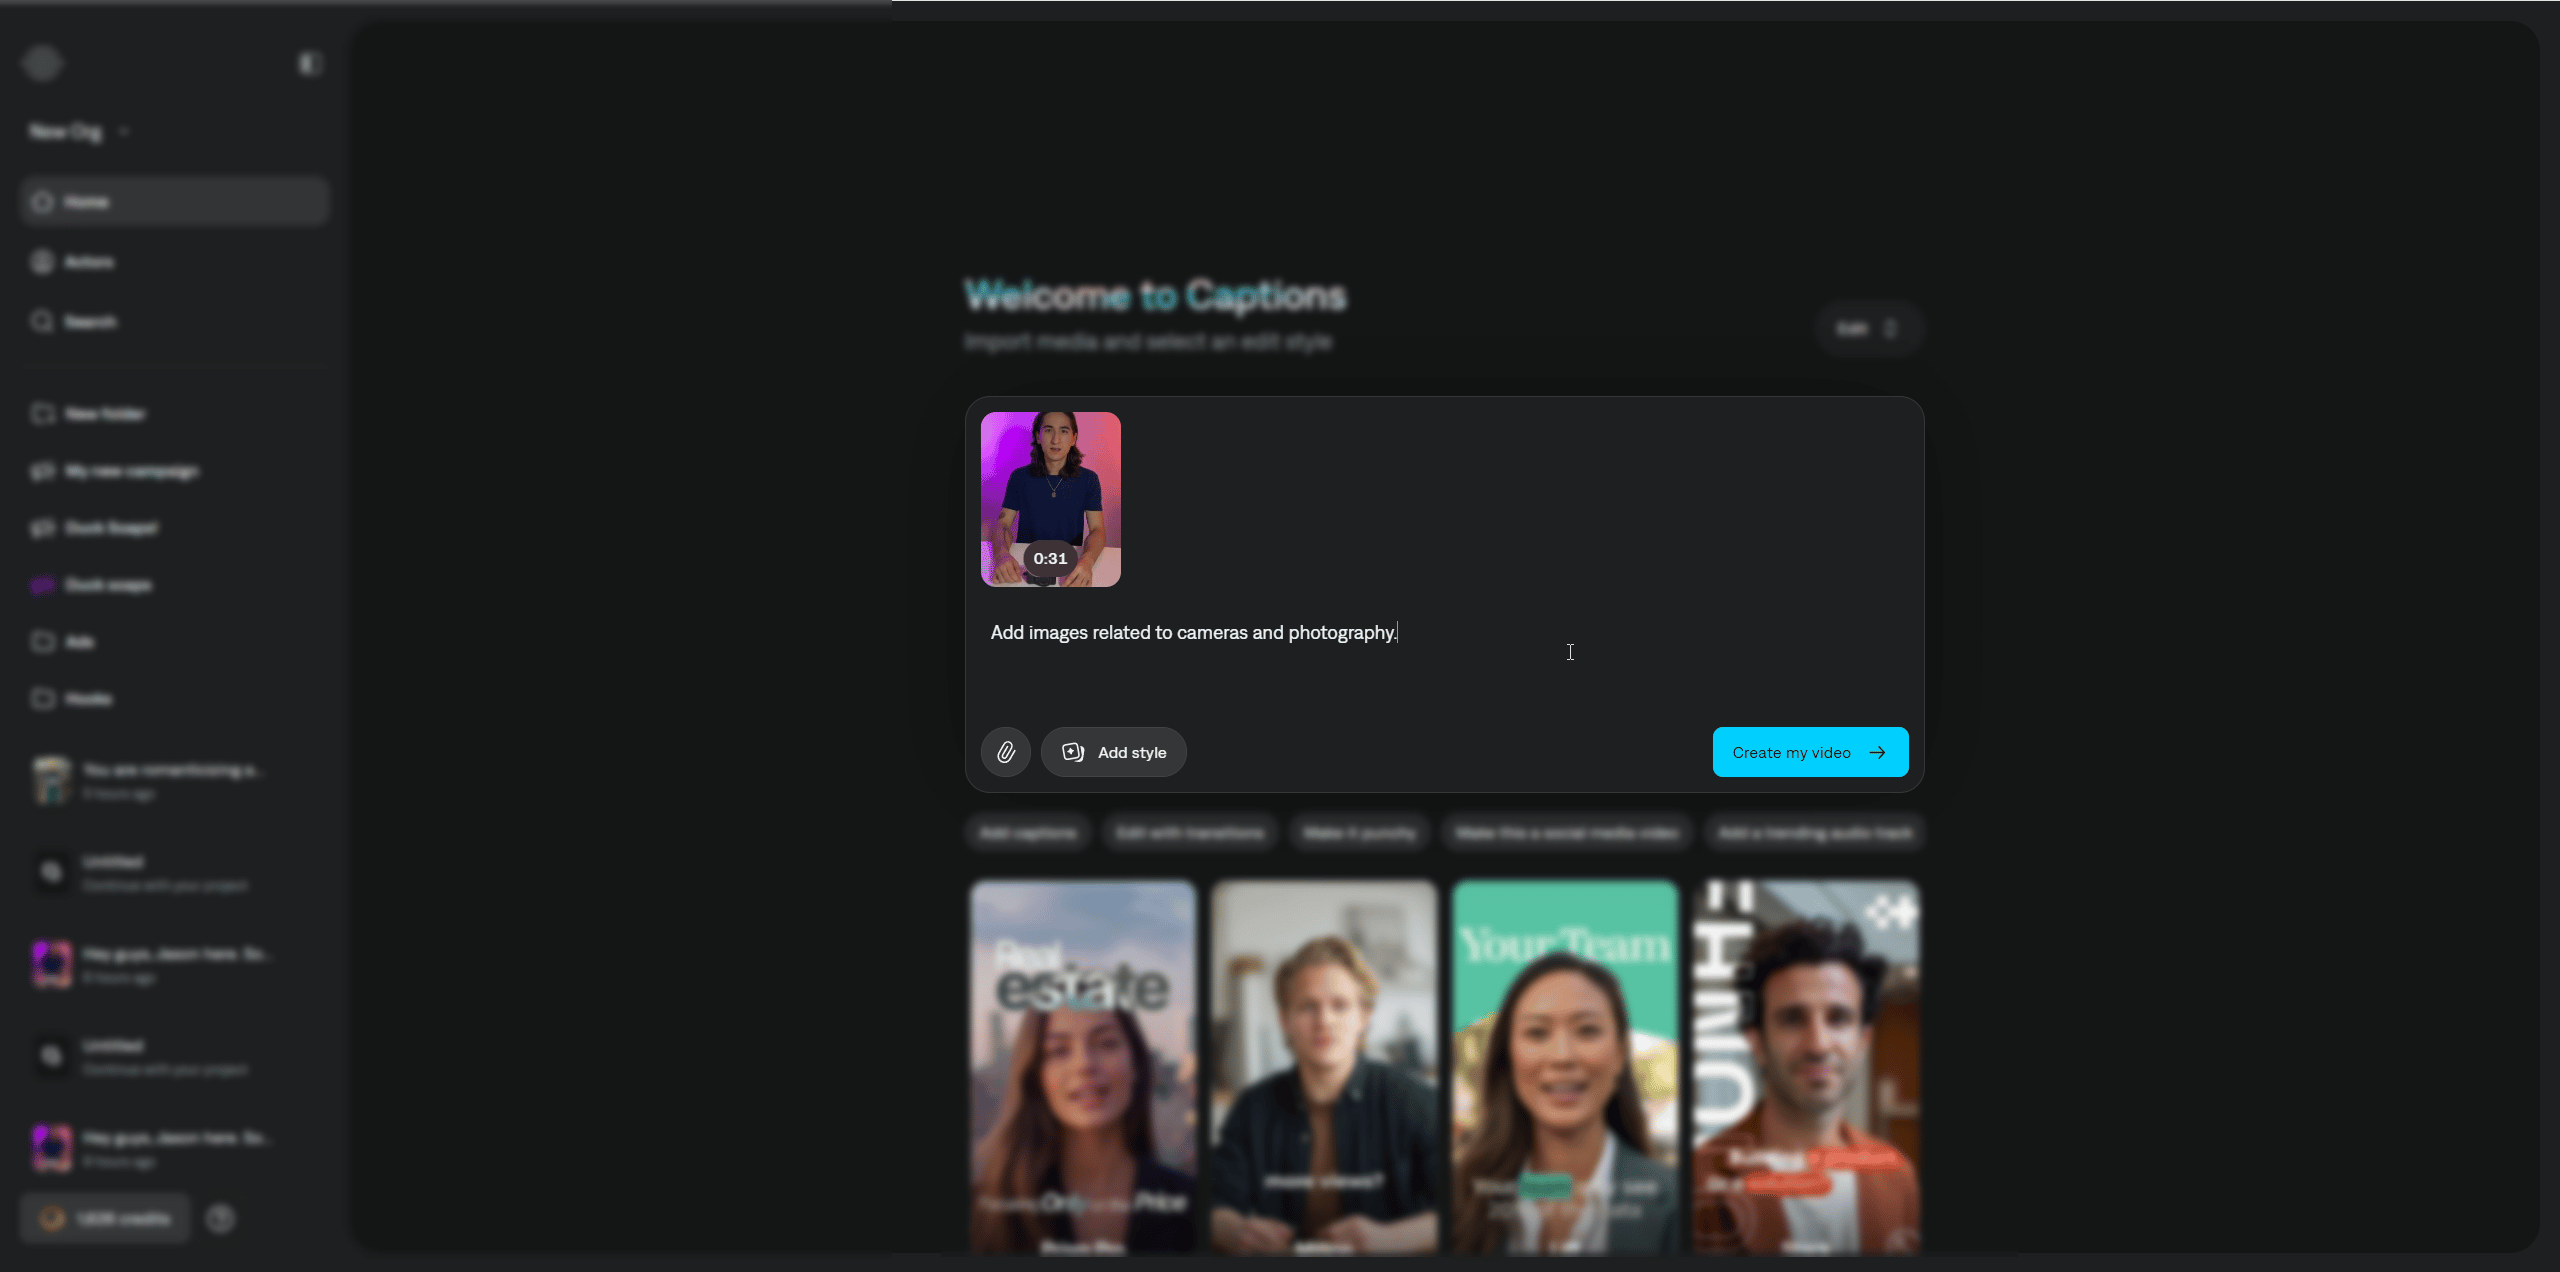
1. On the **Home** page, open the menu and choose **Edit**. Upload your video, then write a **prompt** that explains how you want Captions to edit it.
1. Select the added effect (e.g. an added text) in the timeline
2. Change its color, position, image or delete it
To change the style of a shot:
* Tap on your shot in the timeline
* Tap **AI Edit**
* Choose your new shot style
* To prevent existing images from getting removed, you can enable the **Keep existing images** option.
### AI Edit workflow on the web
1. On the **Home** page, open the menu and choose **Edit**. Upload your video, then write a **prompt** that explains how you want Captions to edit it.
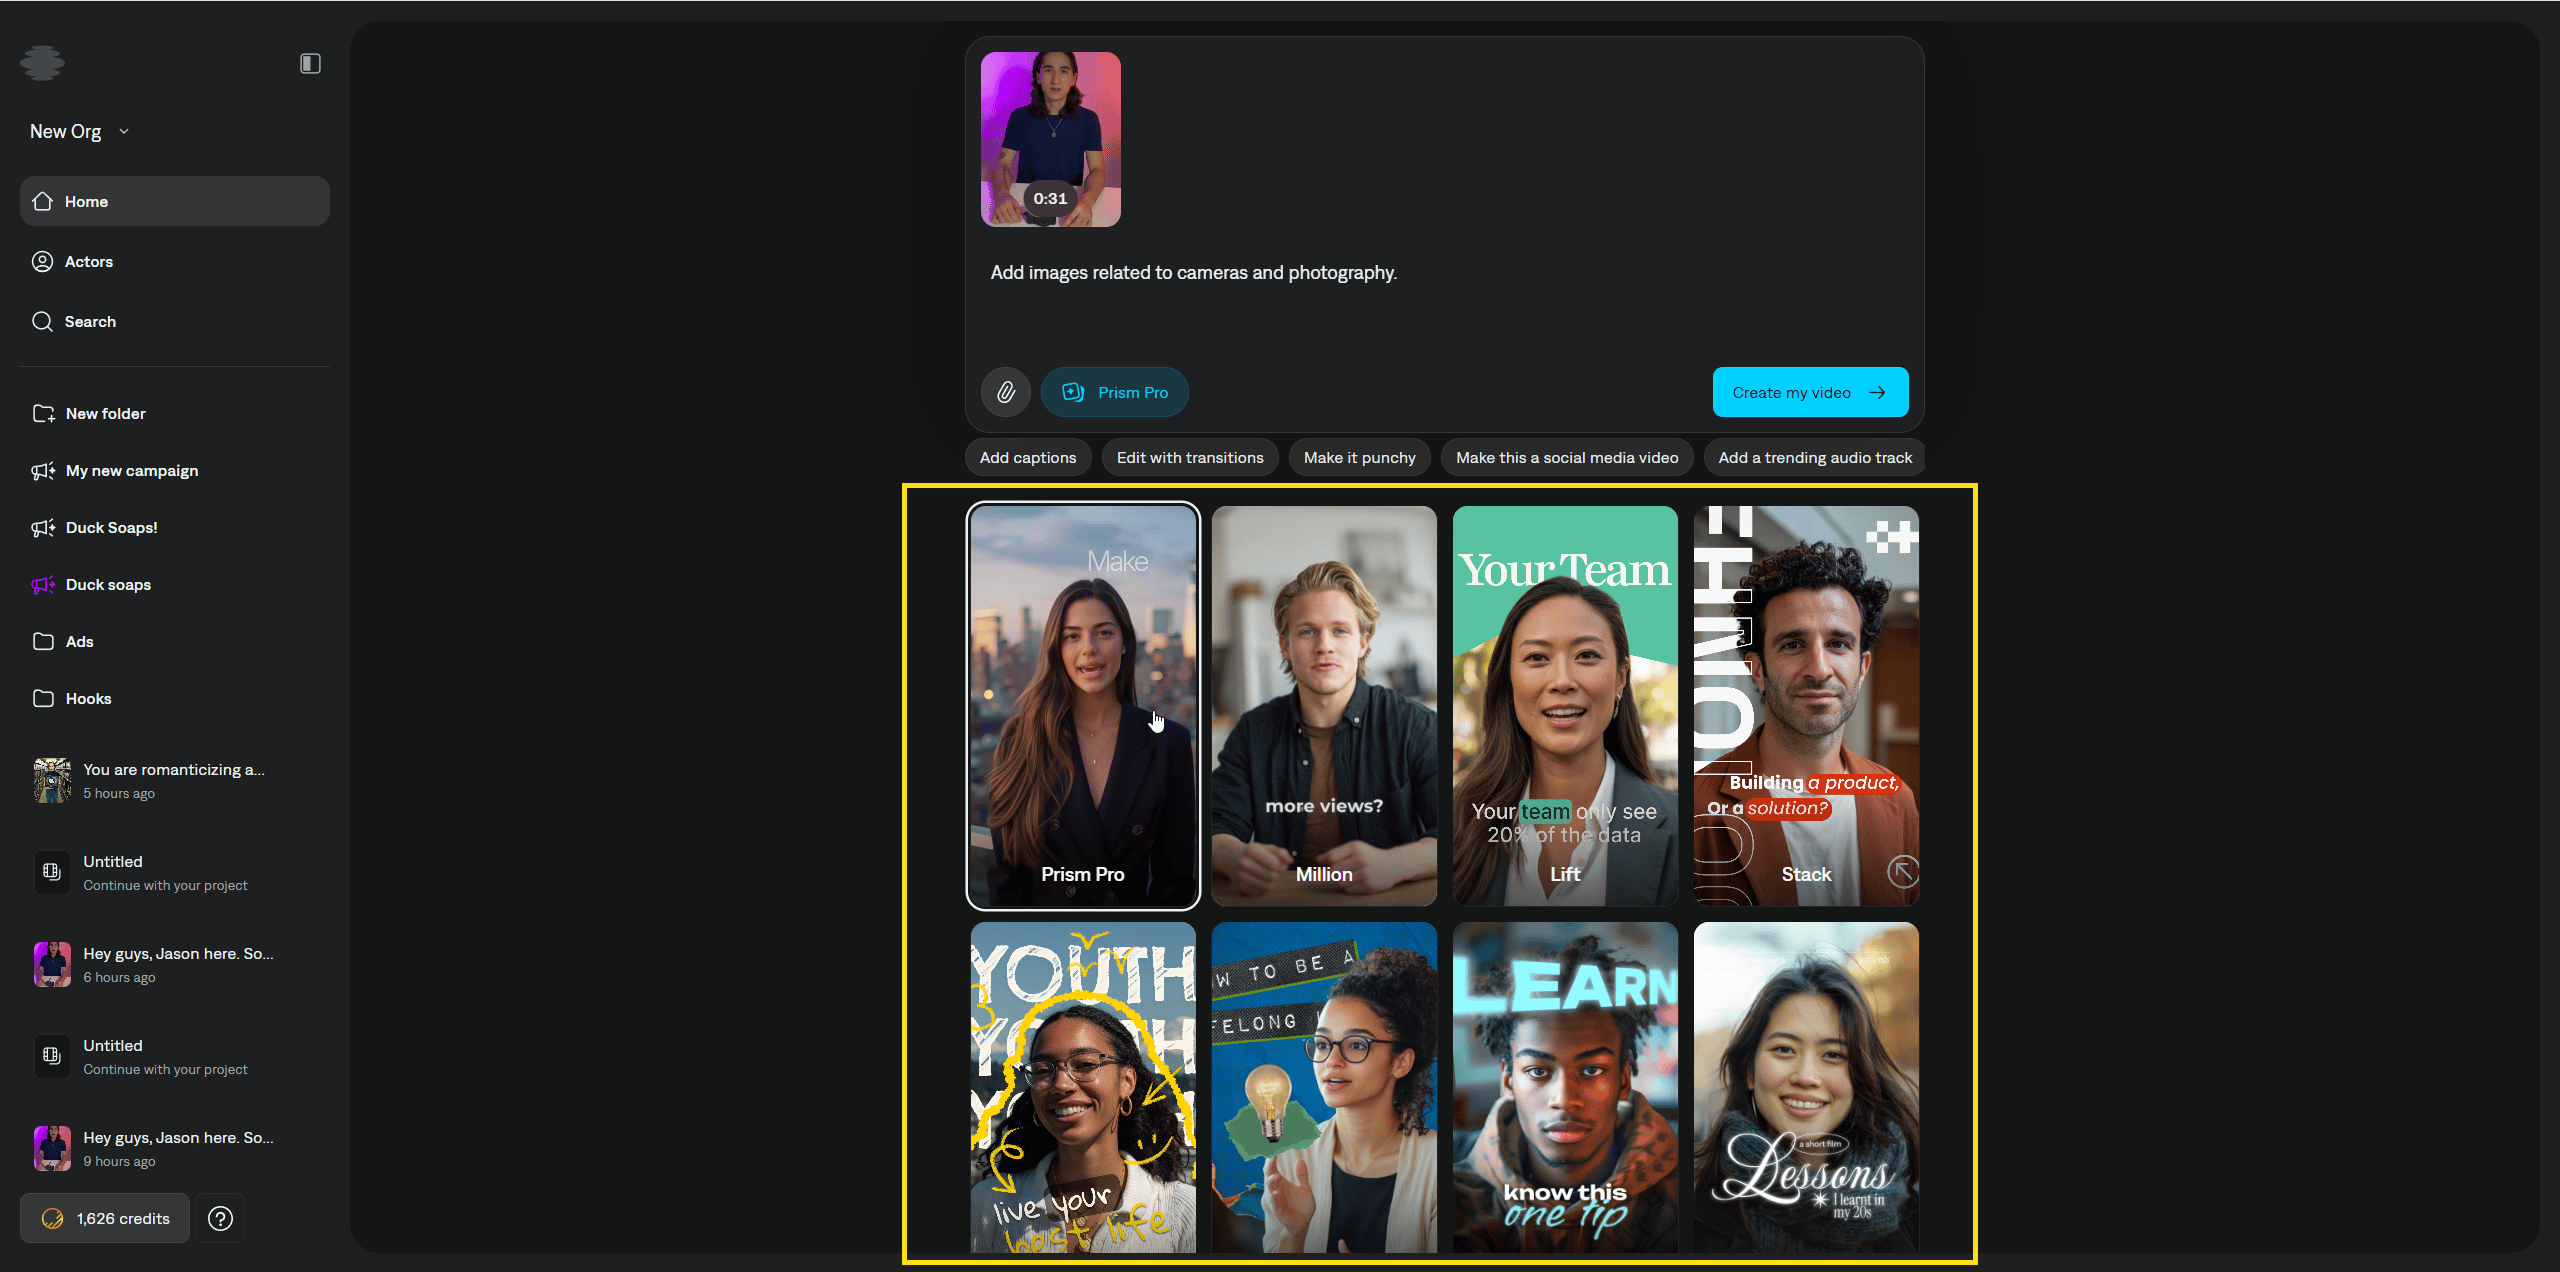
 2. In the style library, select an **AI Edit** style for your project.
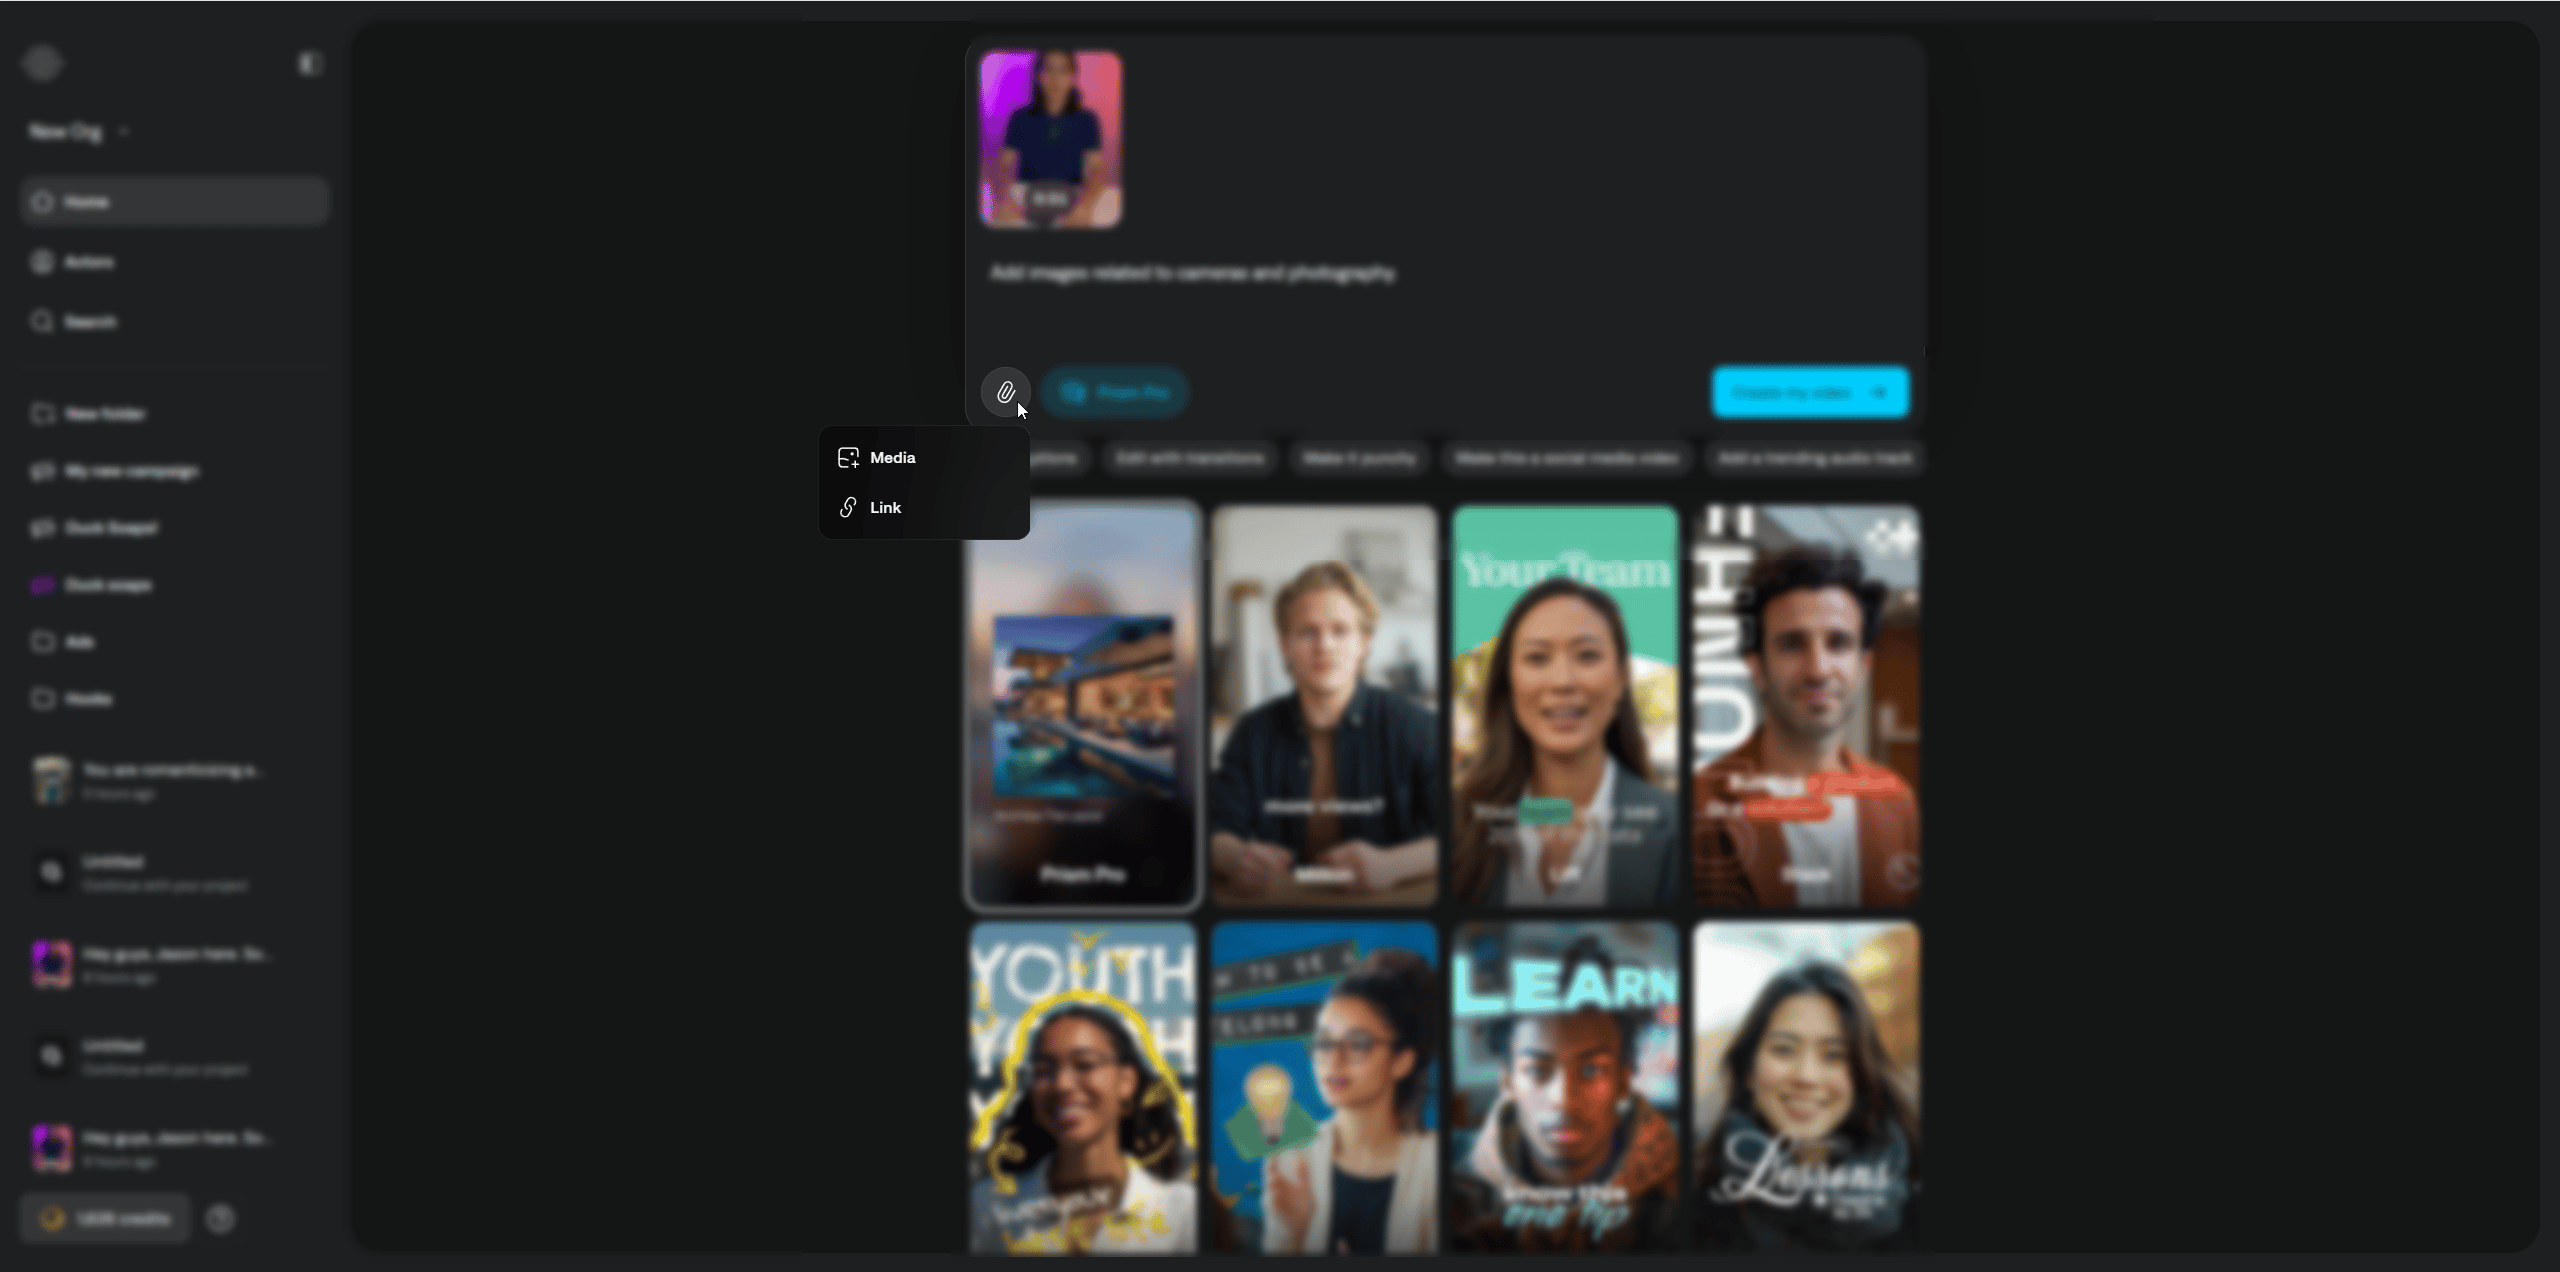
 3. Optionally add custom **media** (images and videos) to use in the edit. You can also paste **links** to website pages if you want Captions to pull context from a product page or similar and use it while editing.
 4. Click **Create my video** to start the project. Captions prepares the project settings for generation. You can adjust those settings before the final render:
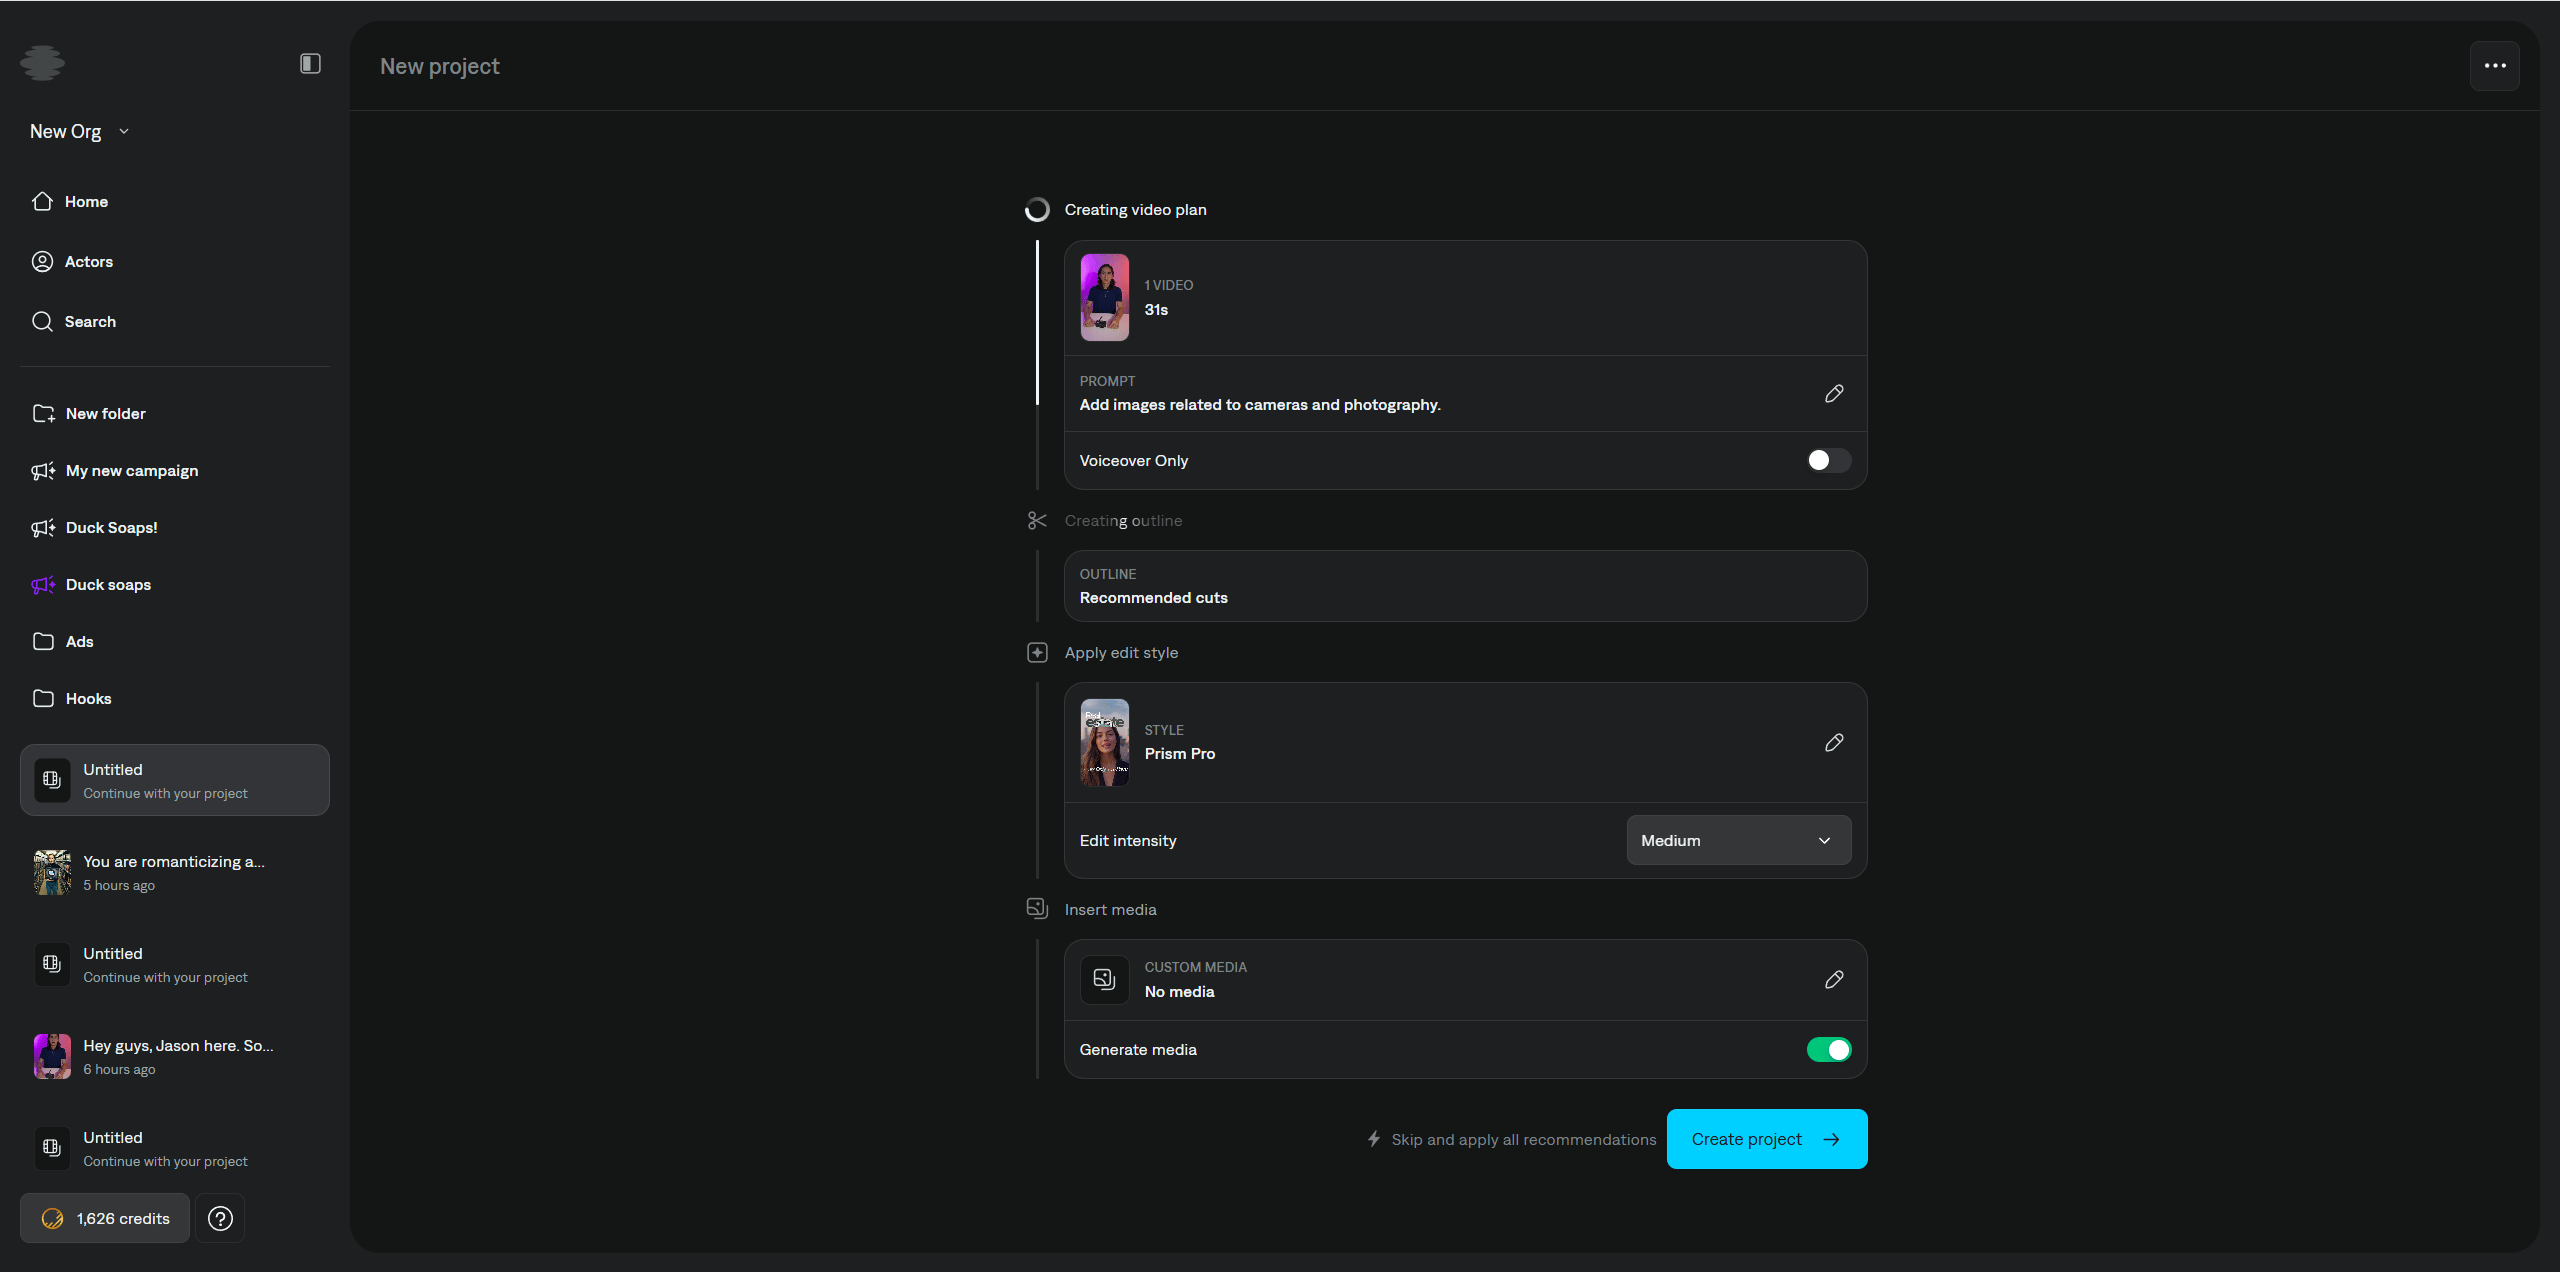 * **Edit the prompt:** Changes produce a new video plan.
* **Voiceover only:** Turn on if you do not want AI actor faces in the video.
**Outline**
* **Recommended cuts:** Review the suggested cuts. Captions detects pauses such as filler sounds (for example, "um" and "hmm") and can remove them from the audio and outline. To keep the original timing and audio, click **Restore original**, or click **Revert** on each cut you want to undo. Then click **Save**.
**Apply edit style**
* **Style:** Change the editing look for the AI video.
* **Edit intensity:** Controls how much editing and how many effects are applied.
* **Color:** Adjusts color branding for edits and [captions](/help/docs/captions/styles).
**Insert media**
* **Custom media:** Import extra images and [B-roll](/help/docs/visual/media) to use in the edit.
* **Generate media:** Lets Captions generate B-roll and images for the edit. This option uses more credits.
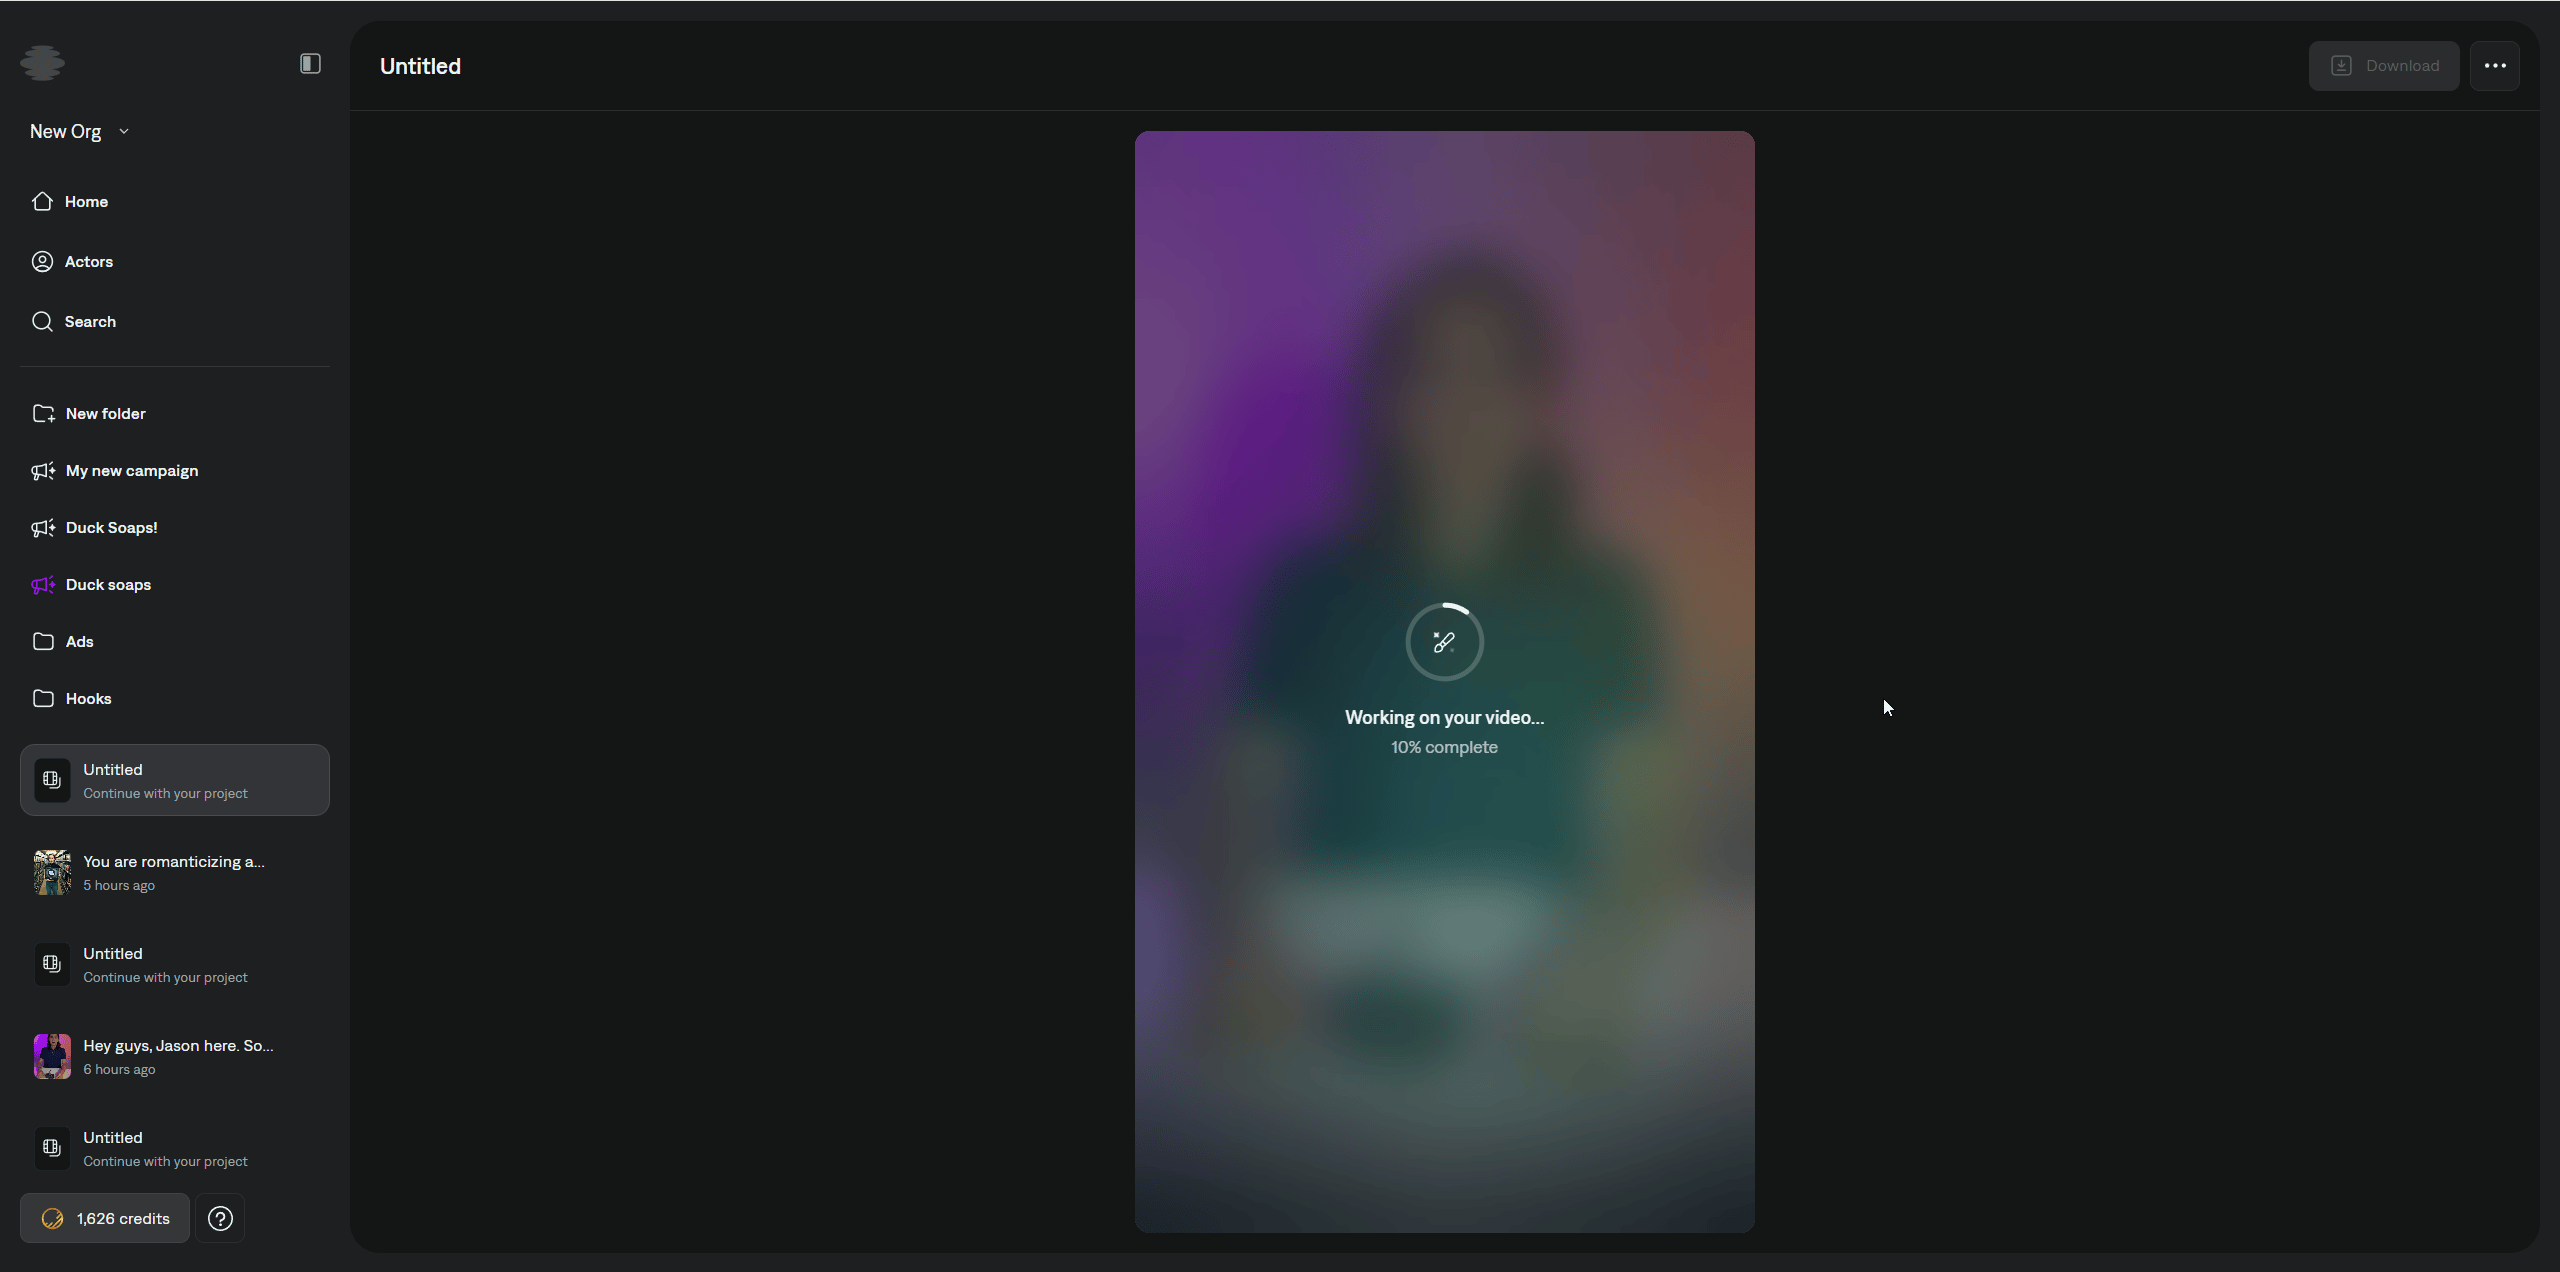
5. When you are finished, click **Create project**. Captions begins generating your project. The process may take a few minutes.
* **Edit the prompt:** Changes produce a new video plan.
* **Voiceover only:** Turn on if you do not want AI actor faces in the video.
**Outline**
* **Recommended cuts:** Review the suggested cuts. Captions detects pauses such as filler sounds (for example, "um" and "hmm") and can remove them from the audio and outline. To keep the original timing and audio, click **Restore original**, or click **Revert** on each cut you want to undo. Then click **Save**.
**Apply edit style**
* **Style:** Change the editing look for the AI video.
* **Edit intensity:** Controls how much editing and how many effects are applied.
* **Color:** Adjusts color branding for edits and [captions](/help/docs/captions/styles).
**Insert media**
* **Custom media:** Import extra images and [B-roll](/help/docs/visual/media) to use in the edit.
* **Generate media:** Lets Captions generate B-roll and images for the edit. This option uses more credits.
5. When you are finished, click **Create project**. Captions begins generating your project. The process may take a few minutes.
 ## Requirements
For best results, your video should:
* Be 2 minutes (1 minute on desktop) or less in length. If the video you choose is over 2 minutes, you will be able to trim it.
* Have only a single person talking
* In vertical mode (9:16)
* Not already be edited (Eg., No trims, transitions, music, or sound effects).
AI Edit supports 21 [Premium editing styles](/help/guides/advanced/ai-edit-styles): Analog, Blueprint, Clarity, Core, Elevate, Film, Growth, Ignite, Lumen, Magazine, Neon, Prime, Pulse, Rebel, Recess, Sketch, Velocity, Vinyl II
AI Edit supports 95 Basic editing styles: Acamar, Acrab, Alcyone, Aldebaran, Alhena, Alula Ausralis, Altair, Alycone Blue, Alycone Pink, Alycone Purple, Andromeda, Arion Pink, Aries, Bellatrix, Best Performance, Bette, Betelgeuse, Broderick, Buzz, Canopus, Capella, Cartwheel Black, Cartwheel Blue, Cartwheel Purple, Castor, Cassiopeia, Chase, Citadelle, Claudette, Computer, Copernicus, Courage, Cygnus A, Dimidium, Draco, Drive, Electra, Energy, Epsilon, Finlay, Freshly, Gienah, Glow, Grace, Haedus, Helix, Ingrid, Irena, Kang, Leo, Lumin, Lynx, Lyra, M81, Magellanic, Marigold, Mars, Medusa, Messages, Milky Way, Million, Mizar, Monster, Nova, Omega Green, Omega Red, Orbitar Black, Orion, Owl, Pacific, Performance, Perseus, Pollux, Pollux B, Poster, Pulse, Quintessence, Recipe, Runway, Scorpius, Sirius, Suzy, Techwave, Theta, Thuban, Triangulum, Travel, Virgo A, Vitamin A, Vitamin B, Vitamin C, Zodiac
## Requirements
For best results, your video should:
* Be 2 minutes (1 minute on desktop) or less in length. If the video you choose is over 2 minutes, you will be able to trim it.
* Have only a single person talking
* In vertical mode (9:16)
* Not already be edited (Eg., No trims, transitions, music, or sound effects).
AI Edit supports 21 [Premium editing styles](/help/guides/advanced/ai-edit-styles): Analog, Blueprint, Clarity, Core, Elevate, Film, Growth, Ignite, Lumen, Magazine, Neon, Prime, Pulse, Rebel, Recess, Sketch, Velocity, Vinyl II
AI Edit supports 95 Basic editing styles: Acamar, Acrab, Alcyone, Aldebaran, Alhena, Alula Ausralis, Altair, Alycone Blue, Alycone Pink, Alycone Purple, Andromeda, Arion Pink, Aries, Bellatrix, Best Performance, Bette, Betelgeuse, Broderick, Buzz, Canopus, Capella, Cartwheel Black, Cartwheel Blue, Cartwheel Purple, Castor, Cassiopeia, Chase, Citadelle, Claudette, Computer, Copernicus, Courage, Cygnus A, Dimidium, Draco, Drive, Electra, Energy, Epsilon, Finlay, Freshly, Gienah, Glow, Grace, Haedus, Helix, Ingrid, Irena, Kang, Leo, Lumin, Lynx, Lyra, M81, Magellanic, Marigold, Mars, Medusa, Messages, Milky Way, Million, Mizar, Monster, Nova, Omega Green, Omega Red, Orbitar Black, Orion, Owl, Pacific, Performance, Perseus, Pollux, Pollux B, Poster, Pulse, Quintessence, Recipe, Runway, Scorpius, Sirius, Suzy, Techwave, Theta, Thuban, Triangulum, Travel, Virgo A, Vitamin A, Vitamin B, Vitamin C, Zodiac