


Share
Scheduling posts on Instagram makes it easy to stay ahead of schedule since you can upload weeks worth of content at once and post automatically according to a set schedule.
This is a game changer for content creators who want to stay connected with their audience consistently. Whether you're aiming to reach your followers when they’re most active or simply free up your time, scheduling posts can help simplify your workflow and keep your feed active.
In this guide, we’ll walk you through how to schedule posts on Instagram so you can manage your content like a pro.
Can I Schedule Instagram Posts?
Yes, you can schedule posts on Instagram using the native feature or third-party tools. It’s a great way to stay organized and ensure your content reaches your audience, even when you're not online. If you’re ready to start scheduling posts, here are a few things to keep in mind:
- Profile type — To schedule posts directly on the app, you'll need an Instagram business account or creator profile. You can easily switch to one in your account settings if you haven’t already done so.
- Content and timing — The app lets you schedule up to 25 posts a day and up to 75 days in advance, so prepare plenty of content in advance. This can keep your feed active for weeks or even months at a time.
- Crossposting — Some tools allow you to schedule posts for multiple platforms at once. Keep in mind that if you change the account types or links after scheduling a post, it won’t be published.
- Scheduling tools — Instagram’s native scheduling gets the job done for basic needs. However, if you’re looking for more flexibility, third-party Instagram post scheduler tools can take your social media management to the next level.
With Captions, you can automatically generate and schedule posts, freeing up time to create more content. Our AI platform can also make a customized social media plan so you never miss a beat.
The Importance of Scheduling Instagram Posts
From saving time to improving consistency, here are some top benefits of scheduling your posts.
Save Time and Reduce Stress
If you’re creating Instagram content as a side hustle or fun hobby, you won’t necessarily have time to post every day. With scheduling, you can plan multiple uploads at once so you don’t have to scramble for content at the last minute. This frees you up to focus on other tasks, knowing your channel is ready to go.
Post When Your Audience Is Active
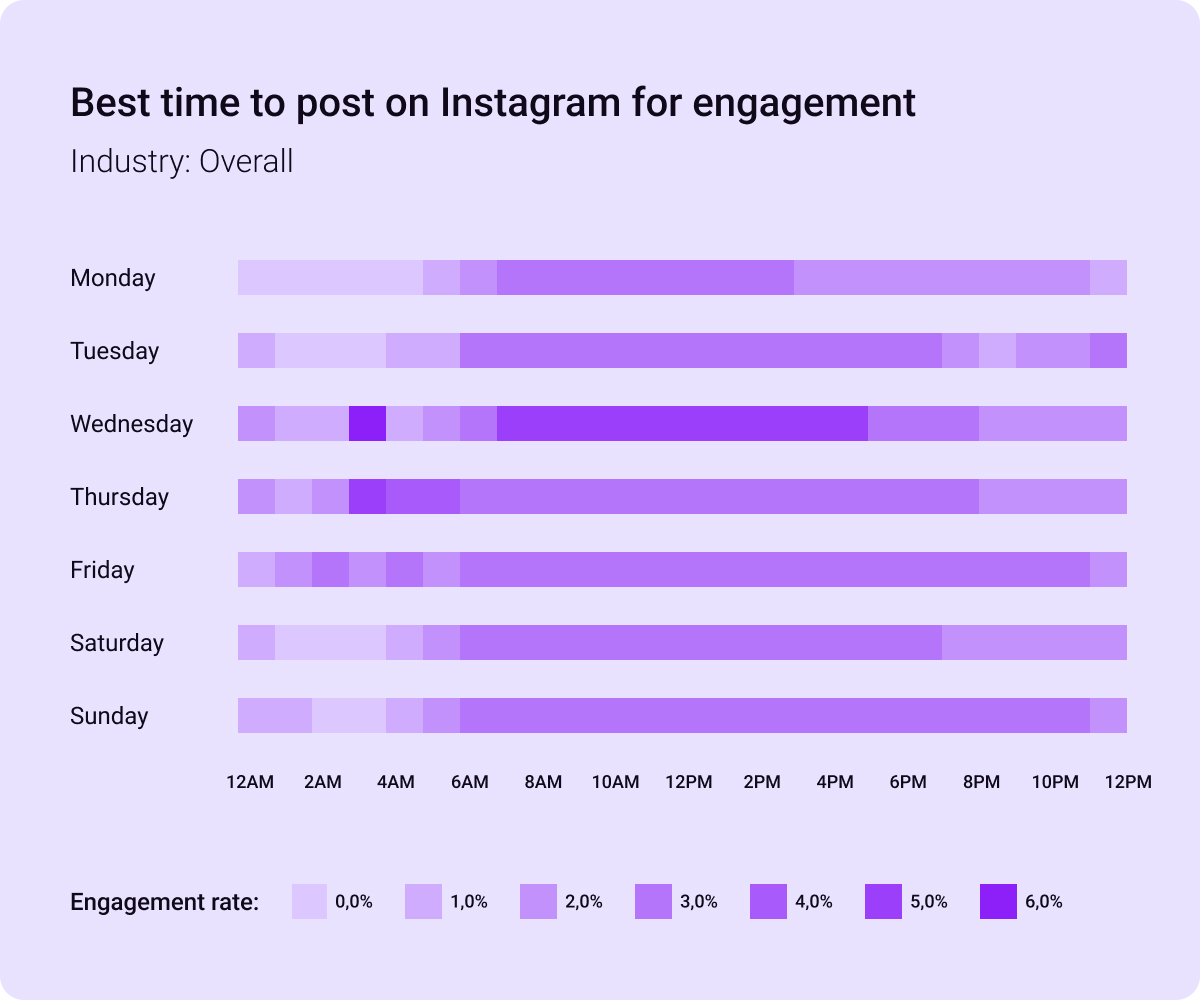
Scheduling helps you hit the sweet spot when your audience is most likely to engage. To find the best times to post, start by checking your Instagram analytics page. Look for the “Accounts reached” section to find your audience’s demographics.
There, you can see where the majority of your followers live and post during peak hours in that time zone. This ensures you connect with your followers at the ideal moment and increases the chances that people will interact with your content.
Note: Only professional accounts (business or creator) have access to Instagram’s internal analytics platform.
Stay Consistent
Maintaining a regular posting schedule makes it easier for followers to know when to expect something new from you. If they enjoy your uploads, they may start to check in on your page when you tend to post. Scheduling is the easiest way to keep this regularity, as you can ensure your videos go up at the same time every week.
How To Schedule Instagram Posts Using the Instagram App
If you’re using the Instagram app, follow these easy steps to schedule uploads:
- Make a new post — Open Instagram and tap the plus icon at the bottom of your screen to create a new post or Reel. Select which photo or video you want to import.
- Edit your content — Write your caption, add trending hashtags, and select filters.
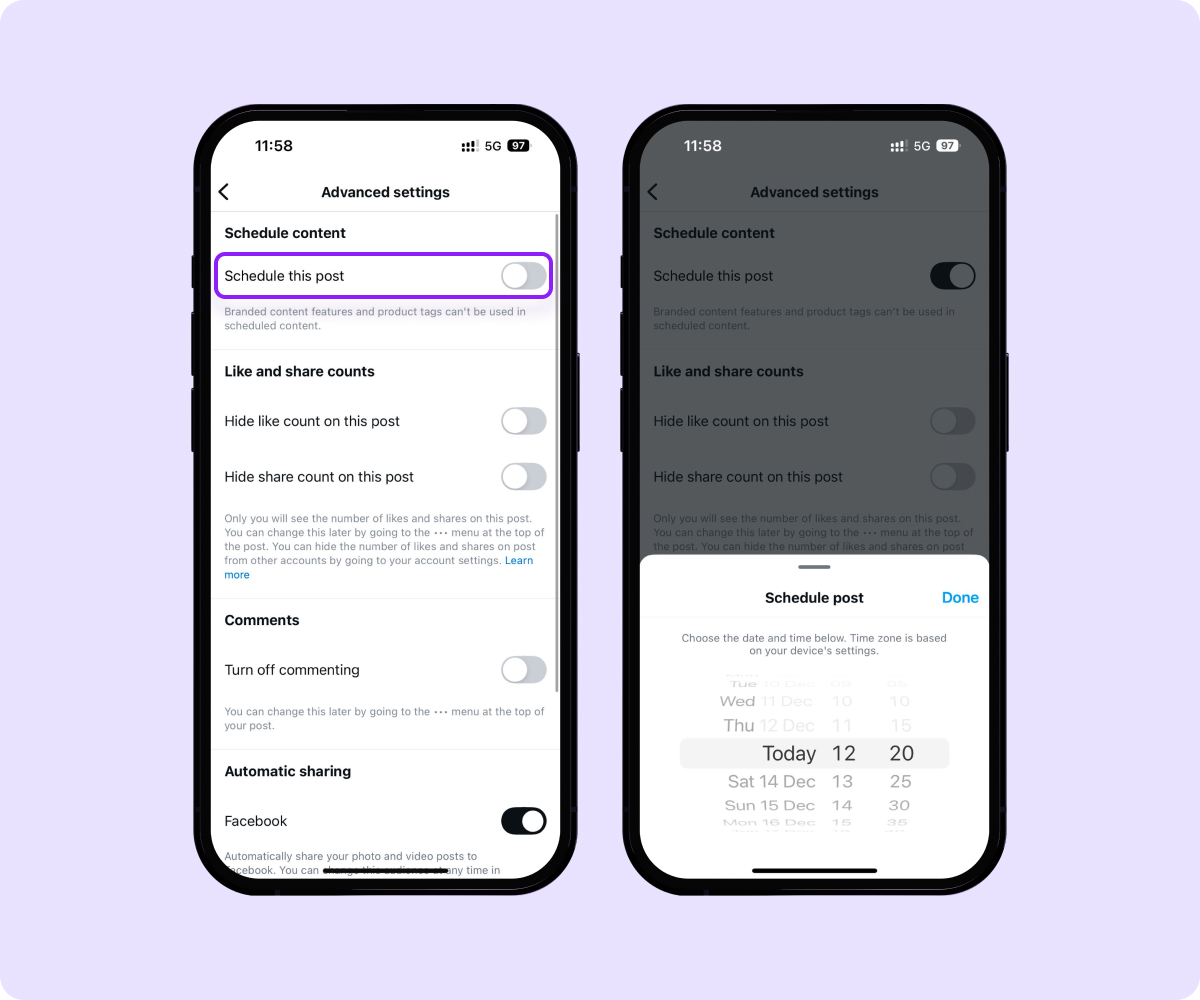
- Set your time and date — Scroll to the bottom and tap “Advanced settings.” Then, select the date and time you want your post to go live.
- Save your changes — Tap “Schedule” to save your edits. The app will automatically publish your post when the time comes.
How To Schedule Instagram Posts Using Meta Business Suite
Meta Business Suite lets you plan and set your posts to go live at your preferred time. Here’s how:
- Sign in — Head over to your Facebook Page and click on Meta Business Suite in the left-hand menu.
- Create a post — Click “Content” or “Planner,” then use the drop-down tab to choose what type of post you want to make.
- Add content — Under “Post to,” choose your Instagram account (and Facebook, if you want). Upload your image or video, write your caption, and add any mentions or hashtags.
- Preview your post — Before scheduling, take a moment to review how your post will look on Instagram. Make any necessary adjustments to the content or formatting.
- Schedule — Tap “Schedule” to choose when to upload your post.
3 Tips for Scheduling Instagram Posts
Consider these strategies to make the most of Instagram’s scheduling feature.
1. Create a Content Calendar
This calendar lays out your content plan for several weeks or months at a time, keeping your posts consistent and well-organized. Making this outline gives you a clear view of your posting frequency and content variety. This way, you can see whether your schedule aligns with your goals and make adjustments as needed.
2. Use Instagram’s Insights Tool
Instagram’s analytics page helps you track your posts’ performance so you can understand what your audience prefers. By analyzing metrics like engagement rate, reach, and impressions, you can adjust your scheduled posts to reflect what’s working and improve future content.
3. Avoid Over Scheduling
While this feature allows you to post content regularly, overdoing it can actually hurt your account. Saturating your audience’s feed with your posts can cause them to skip your content. It may also signal to Instagram’s algorithm that you’re spamming content, which can cause them to shadowban you.
Overloading yourself with too many scheduled posts at once can also lead to burnout. Although scheduling means you don’t need to upload daily, you still have to create the content in advance. So, it’s better to set up a schedule you can manage.
Boost Your Productivity With Captions
Scheduling Instagram posts is an excellent way to enhance visibility, improve audience engagement, and save valuable time. However, to capture your followers’ attention, you still need to create engaging content to upload on the platform.
Enter Captions, an AI tool that helps with every stage of content creation. Generate scripts, polish posts with our Instagram Video Editor, and let Social Studio manage your uploading schedule.
Try Captions today and start creating content that connects with your audience.
FAQs
Can You Schedule Posts on Instagram?
Yes, you can schedule Instagram posts. The platform offers built-in scheduling options for business and creator accounts. Or, you can use third-party tools to get even more control over your uploading schedule.
Why Can't I Schedule Posts on Instagram?
This feature isn’t available for every type of creator or post. Here are a few reasons you may not be able to schedule content:
- Account type — Personal accounts can’t schedule posts. This feature is only available to business and creator profiles. Thankfully, it’s easy to switch from a personal account to a professional one if you’d like.
- Post type — Currently, Instagram doesn’t support scheduled posts that tag products, include sponsorships, have coauthors, or feature fundraisers.
- Tool connectivity — If you’re using a third-party platform to schedule content, make sure it’s properly connected to your Instagram account.
Where Did Scheduled Content Go on Instagram?
If your scheduled content has disappeared, check your account settings and verify that the posts are set to publish at the right time. In some cases, issues like connectivity problems or changes to your account type (from business to personal) can cause scheduled posts to not show up. Double-check your settings, and reach out to Instagram support if the issue continues.
Why Can't I Schedule Reels on Instagram?
Instagram allows you to schedule Reels in their app, so if this feature isn’t working, try uploading posts through a third-party service instead. You can also contact customer support for more assistance.
By
January 29, 2025
-
7
Min Read
Stay in the loop
Subscribe to our newsletter and get all the news from Captions. No spam, we promise.
Oops! Something went wrong while submitting the form.
Professional videos made easy


