


Share
High-quality videos are great, but they come at a cost — large file sizes that can be a hassle to store and share. That’s where video compression comes in. By reducing the size of your videos, you can free up space on your iPhone, speed up uploads, and share clips effortlessly across apps.
In this guide, we’ll explore how to compress a video on an iPhone without losing quality.
Benefits of Video Compression for iPhone Users
If your videos take up a lot of storage space or are too big to share, learning to reduce video sizes on your iPhone can help — here’s how.
Saves Storage Space Without Deleting Videos
Videos on iPhone can quickly fill up available storage, leaving little room for new recordings, apps, and system updates. Instead of deleting videos, you can compress them to reduce their file size while keeping the content intact.
Additionally, compressing videos before uploading them to iCloud helps you avoid extra storage costs. Smaller files also sync and download faster, making them more accessible across devices.
Speeds up Sharing and Uploading
Large files often take a long time to send via email or file-sharing services. Some platforms even reject files that exceed certain size limits. Reducing video size on iPhone enables faster transfers. This is also true for social media uploads — smaller videos process at higher speeds.
Optimizes Video Quality for Different Platforms
Learning how to make a video file smaller on an iPhone lets you adjust resolutions and frame rates to suit specific platforms. For example:
- Social media uploads work well with 1080px or 720px.
- Email or messaging apps require smaller file sizes for quick sharing.
Enhances Video Editing Performance
Adjusting large, uncompressed files on video editing software slows down processing and rendering. Compressed videos load faster, export quickly, and require less system power, making editing more efficient.
Methods To Reduce Video Size on iPhone
Your iPhone has some built-in settings and editing tools to make your videos smaller. Here are a couple of easy ways to reduce video size on an iPhone while keeping the quality intact.
Adjust Video Recording Settings on iPhone
One of the simplest ways to prevent large files is to adjust your video recording settings before you even start filming. The higher the resolution and frame rate, the bigger the file. Follow these steps to lower your settings.
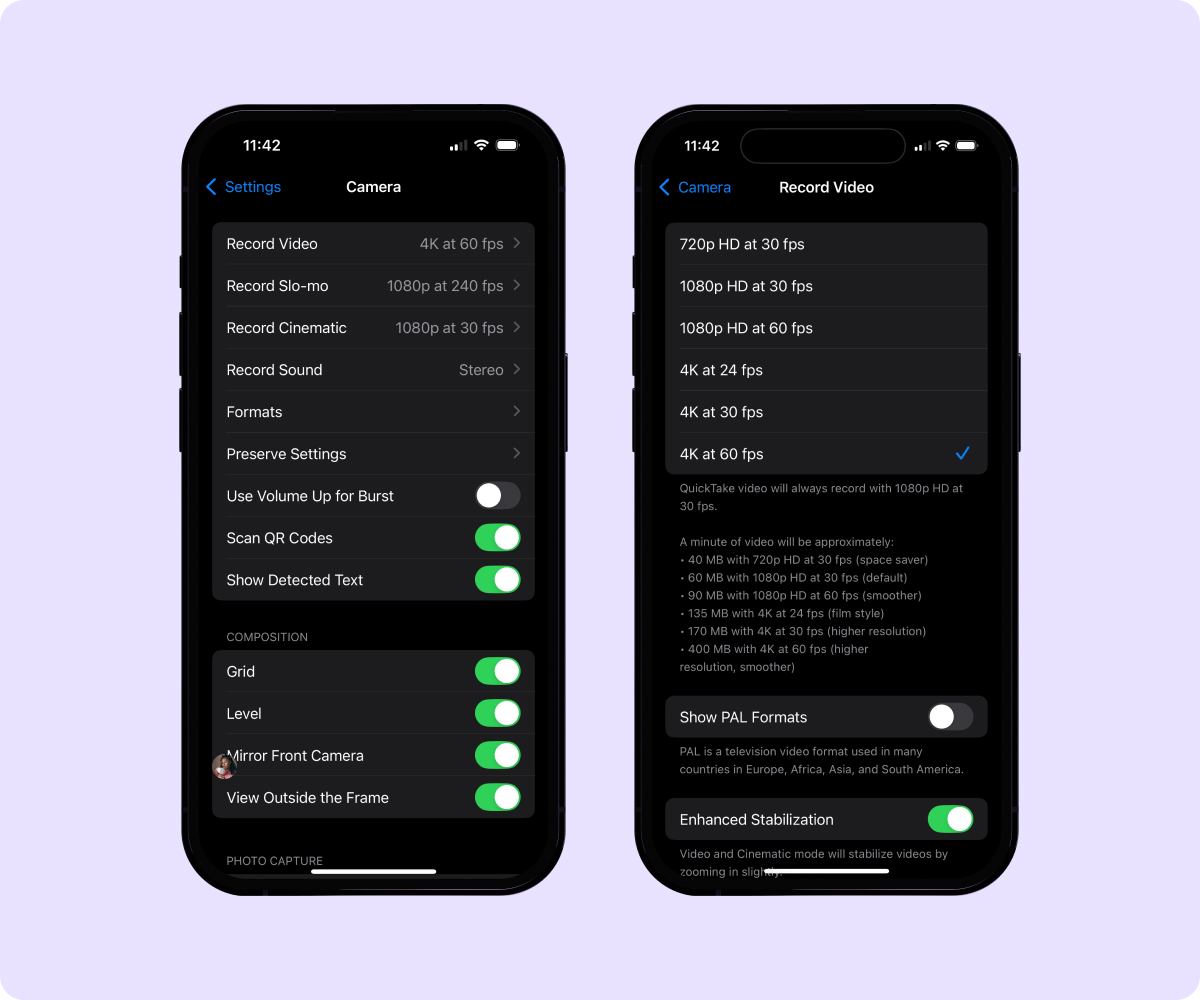
Open the Settings
Go to your camera settings and select “Record Video.”
Adjust the Frame Rate
This refers to how many frames per second (FPS) your camera will capture, which affects how smooth your video looks. Higher frame rates, like 60fps, make movements look smoother but also increase file size. Switching to 30fps cuts the size nearly in half without making a big difference in quality.
Select a Recording Resolution
Choose one of the smaller recording options.
Pro tip: If you're filming a quick clip for an Instagram Story or TikTok video, 1080p at 30fps is a great balance between quality and file size. When you’re recording videos for personal use, opt for 720p to shrink the file size even more.
Edit the Length of Your Video on iPhone
If you’ve already recorded a video that’s too large, you can trim unnecessary parts to make it smaller. Cutting out just a few seconds can make a big difference, especially for videos you want to email a friend or upload to social media. Here’s how to adjust existing footage:
- Open the Photos app — Find the video you want to edit.
- Access the video editor — Tap “Edit” in the top-right corner to open the video editing tools.
- Trim the video length — At the bottom, you’ll see a timeline of your video. Drag the yellow sliders on each side to trim the parts you don’t need.
- Save the trimmed video — When you’re happy with the edit, tap “Done,” then choose between the following two options. “Save Video” overwrites the original, while “Save Video as New Clip” keeps both the original and the trimmed version.
- Check the new file size — To see how much smaller the video is, tap “Info” and check the file size details.
Simplify Video Resizing With AI Tools
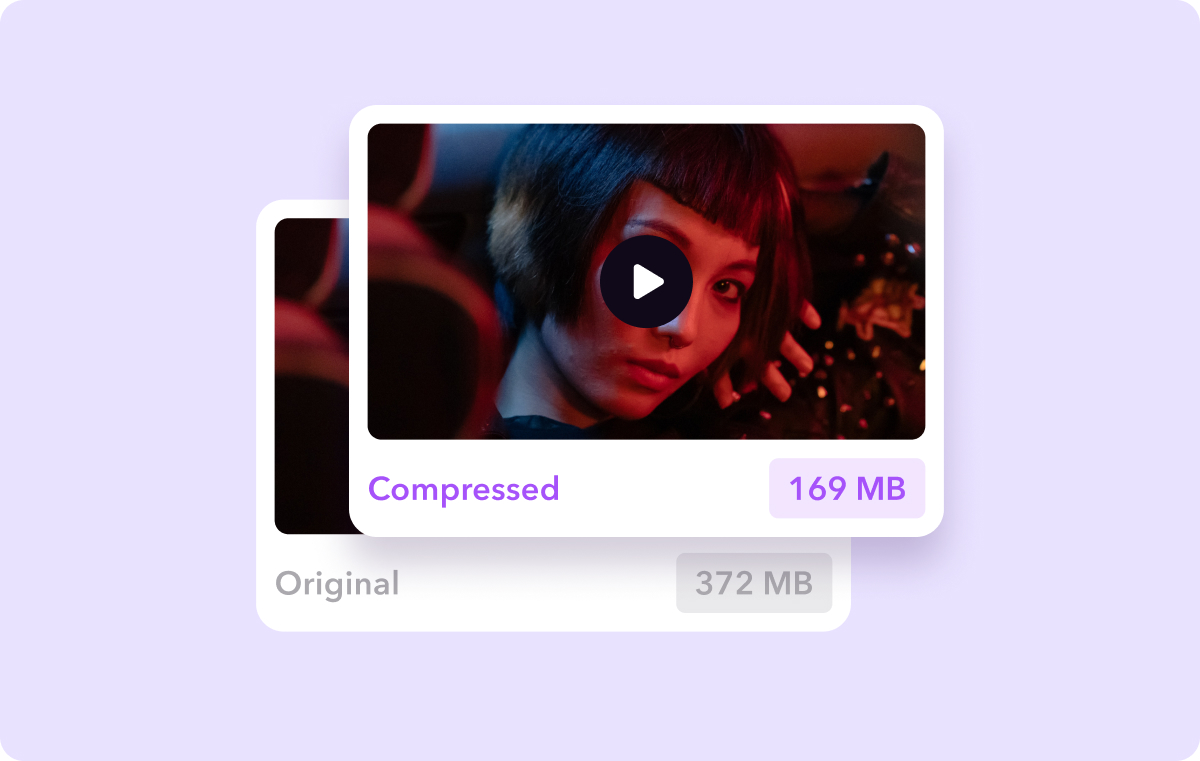
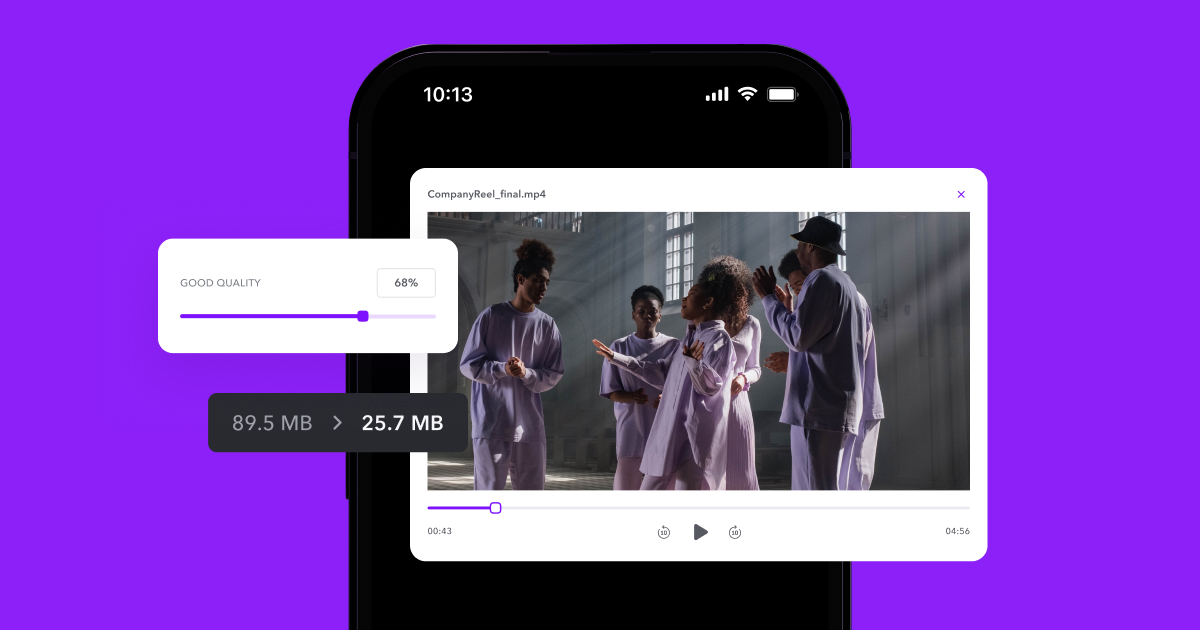
Manually trimming clips can help reduce file sizes, but it takes time and effort. If you want a faster, hassle-free way to compress videos without losing quality, try Captions’ Compress Videos feature.
Why Use Captions for Video Compression?
Captions uses AI to automatically adjust videos for email attachments and social media platforms, so you don’t have to worry about file size limits or formatting issues.
Our tools offer the following benefits:
- Doesn’t require editing expertise — No need to mess with technical settings, since AI takes the reins.
- Tailors posts to any platform — Export in the right format and resolution for social media and messaging apps.
- Maintains quality — Reduce video size without making it look blurry or pixelated.
Saves storage space — Free up room on your iPhone without deleting your videos.
Can I Compress Videos on My Computer, Too?
If you prefer to work on your computer over your iPhone, Captions offers a simple alternative in our desktop app. To reduce your videos’ size, follow these steps:
- Open the App Store — Download Captions’ desktop app to your computer.
- Create your profile — Follow the steps to set up your profile.
- Upload your video — Select, drag, and drop your video files into Captions.
- Compress the video — Hit “Compress” and let AI reduce the file size while keeping your video quality sharp.
- Download the smaller video — Once the compression is done, tap “Download” to save the compressed file to your computer.
Use Captions for Smarter Video Editing
Compressing videos makes your content easier to share, faster to upload, and smoother to edit without sacrificing quality. Whether you’re a content creator or just someone who wants to send a video to friends, using the right tools makes all the difference.
With Captions’ Compress Videos feature, you can reduce file sizes in seconds while keeping your videos crisp and clear. Plus, our AI Video Editor offers smart tools to refine your content with minimal effort.
Stop struggling with bulky video files — download Captions and create high-quality videos with ease.
FAQs
Can I Compress a Video on an iPhone?
Yes, you can compress a video on your iPhone — here are three methods:
- Lower the recording resolution in your camera settings.
- Trim the video length in the Photos app.
- Use third-party apps like Captions to reduce file size without losing quality.
How Do I Lower Video Quality on iPhone?
You can lower video quality on your iPhone by adjusting the recording settings. Go to “Settings,” “Camera,” and “Record Video,” then select a lower resolution.
How Do I Send a Video That’s Too Large on My iPhone?
If a video is too large to send via email or messaging apps, you can compress it using Captions, trim it in the Photos app, or upload it to a cloud service like iCloud, Google Drive, or Dropbox and share the link.
By
April 15, 2025
-
6
Min Read
Stay in the loop
Subscribe to our newsletter and get all the news from Captions. No spam, we promise.
Oops! Something went wrong while submitting the form.
Professional videos made easy


